
Monday, August 6, 2012
Winner winner!!
Mr. Random Generator (who is not present at this time as I have no idea how to put a screenshot of it on here) has chosen a winner for the charm pack of Amy Butler's Gypsy Caravan.....#17 Deborah!! Thank you everyone for playing!
Monday, July 30, 2012
QAL and a Giveaway!
Yep, you read that right! Don't forget to head to FreeSpirit Fabrics' blog today to find my tutorial for this block here! (If you have any questions along the way, please don’t hesitate to ask!)

Be sure to check out the rest of our lineup of crazy talented bloggers and their blocks. There are only 2 weeks left of the Christmas in July Block-a-thon, but if you are behind or are just joining us, put your worries to rest because Free Spirit will be combining all of the tutorials into one handy dandy e-book. Score!
July 2th - Heather at Fiberosity
July 5nd - Pat Sloan
July 6th – Melanie at Melanie Dramatic
July 9th - Pam at Pam Kitty Morning
July 11th - Kelsey at Kelsey Creates
July 13th - Katie at Swim Bike Quilt
July 16th - Kim at Persimon Dreams
July 18th - Amanda at Sasikirana
July 20th - Jane at QuiltJane
July 23th - Kristy at St Louis Folk Victorian
July 25th – Kimberly at Fat Quarter Shop
July 27rd - Lee at Freshly Pieced
July 30th - Jennifer at MJ and Co
August 1st – Mishka at Quilting Gallery
August 3rd - Tiffiny at Free Patchwork Quilt Info August 6th - Tacha at Fat Quarterly
August 8th – Megan at Canoe Ridge Creations
August 10th – Jocelyn at It’s Sew Emma
August 13th – Final Quilt Reveal!
Now for even more fun. FreeSpirit has generously offered up a 6" charm pack of Amy Butler's new reprint of Gypsy Caravan! Yay!

To enter, just leave a comment in this post telling me how long you have been quilting. Mr. Random Generator will pick one lucky winner. If you want to follow, fabulous, but it is not required. One comment per person, please. Be sure to leave a way for me to contact you in case you are the winner (no-reply commenters are hard to find!). Giveaway includes international readers and will be open until Sunday, August 5th, with the winner posted by Monday the 6th. Good luck! And thanks for stopping by!
Monday, April 16, 2012
A Mini For Holly
This post is a week later than I'd planned. It was already revealed here and here, but I'll go ahead and share it again for those of you who didn't already see it. I told you back here that the fabulous Holly had put together my beautiful blog design for me. In exchange, I made a mini quilt for her sewing room, and last week it was delivered to her. I call it a Type of Improv Mini for Holly. Really, the name doesn't matter. I've never been good at naming anything but my children. ;)

I'm thrilled to know she loves it and I really did enjoy putting it together for her. As much as I adore certain fabric lines together (Far Far Away I, Mendocino, Flea Market Fancy, AMH Good Folks, Innocent Crush, the list goes on), it sure is fun to find my own combinations. Holly put together a mosaic so I could get some direction for what she likes. It is a mishmosh of many things, but most of it is right up my alley and I enjoyed fitting in as many aspects as I could without going overboard (hmmm...well, maybe I did go overboard by some people's standards, but Holly & I like it so I'll go with that, lol).
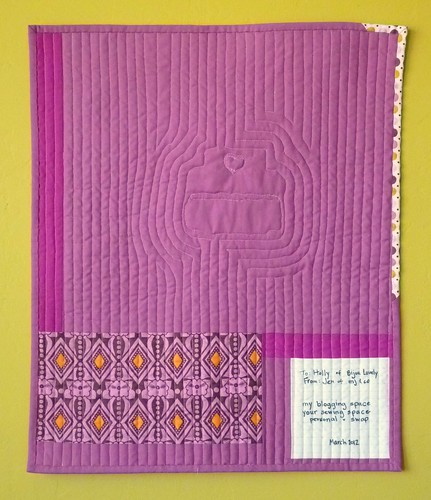
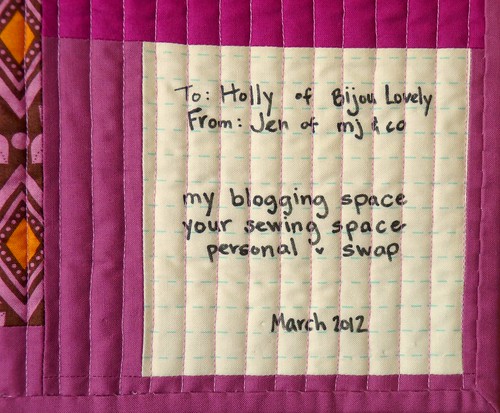
The back I tried to keep fairly simple since it will be against a wall, but I do like how it highlights the quilting, all done in straight (and slightly curvy, hehe) quilting with a walking foot, except for on the typewriter itself, for which I did some free motion quilting to highlight it and the heart. I did include a label for her, something I've only done once before, which was a perfect excuse to use this fun lined paper fabric by Cosmo Cricket.
I have seen Holly here and there on Flickr for the past couple of years, but it was on Instagram sometime in the past several months that we became contacts and where she offered to help me with my blog design. Such a fun and unexpected blessing! I love that various social and online media venues connect people who wouldn't otherwise ever come into contact. I've had the opportunity to meet several online friends in real life, friends that get me and my passion for sewing and quilting, and one day I hope to meet many more of them at fun events like the Sewing Summit andQuiltCon, but for now I am thankful for the day to day connections I get with so many talented individuals, just like Holly. :)
I'm thrilled to know she loves it and I really did enjoy putting it together for her. As much as I adore certain fabric lines together (Far Far Away I, Mendocino, Flea Market Fancy, AMH Good Folks, Innocent Crush, the list goes on), it sure is fun to find my own combinations. Holly put together a mosaic so I could get some direction for what she likes. It is a mishmosh of many things, but most of it is right up my alley and I enjoyed fitting in as many aspects as I could without going overboard (hmmm...well, maybe I did go overboard by some people's standards, but Holly & I like it so I'll go with that, lol).
The back I tried to keep fairly simple since it will be against a wall, but I do like how it highlights the quilting, all done in straight (and slightly curvy, hehe) quilting with a walking foot, except for on the typewriter itself, for which I did some free motion quilting to highlight it and the heart. I did include a label for her, something I've only done once before, which was a perfect excuse to use this fun lined paper fabric by Cosmo Cricket.
I have seen Holly here and there on Flickr for the past couple of years, but it was on Instagram sometime in the past several months that we became contacts and where she offered to help me with my blog design. Such a fun and unexpected blessing! I love that various social and online media venues connect people who wouldn't otherwise ever come into contact. I've had the opportunity to meet several online friends in real life, friends that get me and my passion for sewing and quilting, and one day I hope to meet many more of them at fun events like the Sewing Summit andQuiltCon, but for now I am thankful for the day to day connections I get with so many talented individuals, just like Holly. :)
Wednesday, April 11, 2012
Easy Chile Verde in the Crockpot
This morning I started to make an easy crockpot meal, and thanks to my Instagram loving self, it occurred to me that others might be interested in this easy and delicious recipe. I have to start by saying that this recipe was acquired from my husband’s former co-worker. I sometimes experiment within a recipe to make it to my liking, but otherwise I am not talented to make my own unique combinations. So, thank you, Martha! Here we go!
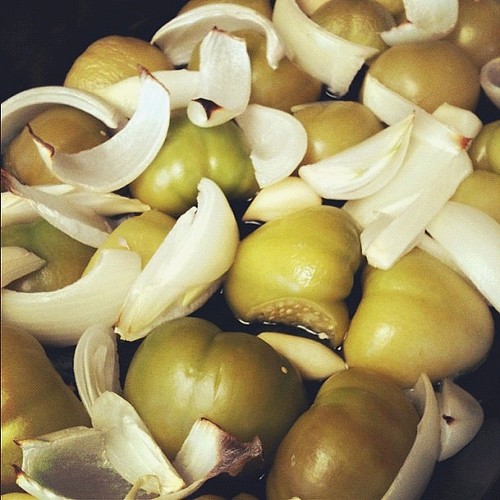
Start with 1 pound of tomatillos (I always grab about 12; if you have a large crockpot and want to go big, add more!), 1 small onion, and some cloves of garlic (I like garlic, so I used 6 large ones today).
Preheat the oven to 350 degrees. Peel everything, rinse and halve the tomatillos, and chop the onion into big chunks. Grab a casserole dish (I use a glass one) and cover the entire bottom with a thin layer of olive oil. Place all ingredients into the dish and roast for 30 minutes.
When that is ready, pour the roasted ingredients into your blender and blend away. Next, add a rinsed bunch of cilantro (I cut off just the very end of the stalks) and a 4 oz. can of diced chiles (I use mild; we have baby tongues here) and blend with the rest of the sauce.

Take some pork chops, amount dependent upon how many mouths you have to feed (I usually buy about 1 or 1.5 pounds for my family of 4), and place in greased crockpot. Add salt & pepper to them according to your liking. Take blender and pour sauce into the crockpot, covering the pork chops. Cover and cook about 8 hours on low. And that's it!

Be sure to discard the fat when you shred your finished meat. We like ours served in tortillas with some cheese and sour cream, burrito style. Yum!! Be sure to let me know if you try it out and let me know what you think or if you customized it at all. Enjoy!!
Start with 1 pound of tomatillos (I always grab about 12; if you have a large crockpot and want to go big, add more!), 1 small onion, and some cloves of garlic (I like garlic, so I used 6 large ones today).
Preheat the oven to 350 degrees. Peel everything, rinse and halve the tomatillos, and chop the onion into big chunks. Grab a casserole dish (I use a glass one) and cover the entire bottom with a thin layer of olive oil. Place all ingredients into the dish and roast for 30 minutes.
When that is ready, pour the roasted ingredients into your blender and blend away. Next, add a rinsed bunch of cilantro (I cut off just the very end of the stalks) and a 4 oz. can of diced chiles (I use mild; we have baby tongues here) and blend with the rest of the sauce.
Take some pork chops, amount dependent upon how many mouths you have to feed (I usually buy about 1 or 1.5 pounds for my family of 4), and place in greased crockpot. Add salt & pepper to them according to your liking. Take blender and pour sauce into the crockpot, covering the pork chops. Cover and cook about 8 hours on low. And that's it!
Be sure to discard the fat when you shred your finished meat. We like ours served in tortillas with some cheese and sour cream, burrito style. Yum!! Be sure to let me know if you try it out and let me know what you think or if you customized it at all. Enjoy!!
Monday, March 5, 2012
A Finish!!
Before I dive into the fun, I have to share a funny story. I've been so excited to receive comments from so many wonderful quilters. They are all very encouraging, especially for this new blogging adventure! I've replied to all (yikes, with the exception of one that I need to remedy)...at least, I thought I had replied. Silly me didn't realize that some were 'no reply' comments, so even though my email allowed me to send replies, several of them are floating in blogland. Oops!! ;) So, if you'd like a reply, please be sure to leave your email address, and I in turn will make sure I check for the essential 'no reply.' Haha!
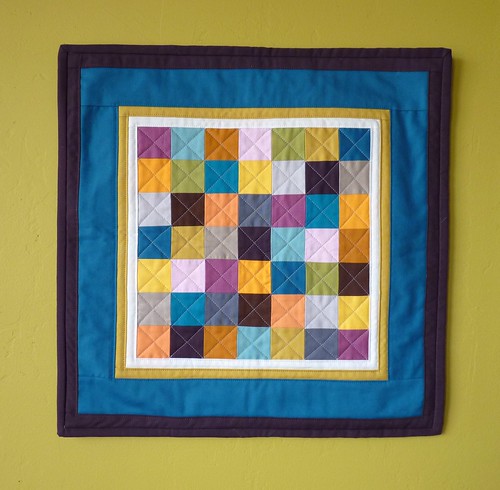
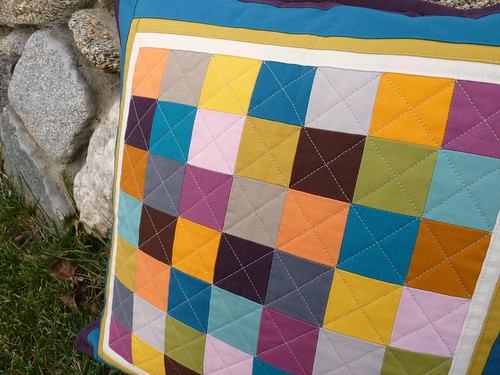
So, Jennifer over at Ellison Lane Quilts has been hosting a Mini Quilt Challenge Contest this month. I only learned about it this week (I am often not up on everything in blogland--there is so much inspiration out there!), and knew it was the perfect nudge I needed to finish something up that I started too long ago. Last fall I was inspired by this post over at Stitched in Color. I grabbed my solids, picked up a few more at my LQS, and got to work. I didn't have time to make any of the deadlines, so I let my project become a neglected WIP. Fast forward to this week, and I am happy to say I finished and LOVE it! Ironically, even though I took photos earlier today, I didn't have a chance to sit down to write my post until four minutes after the deadline. Definitely a bummer, definitely typical of me (I am not an on-time person...at all), but I really am still happy to have finished. So, without further ado, here is what I have dubbed, Solids Squared.
Though this is actually a pillow cover, I have learned recently that a mini can be made into anything. Mini quilts have no place in my house for now, though I do want them in my future sewing room (too bad, right? It actually looks wonderful on my kitchen wall, don't you think?), but pillows are easier to work in. This particular one doesn't actually work in my house, but the point is I was inspired, I tried something out, had fun, and it will be finding a new home with a friend very soon.
It measures about 17" square and includes 16 different Kona cotton solids and one Moda Bella solid (a dark brown that I bought a few years ago). The Konas are ash, stone, curry, raisin, petal, plum, slate, papaya, mango, yarrow, corn yellow, sage, olive, caribbean, teal blue, and snow (border). I think those are all correct, at least as well as I can tell from my Kona color card. ;)
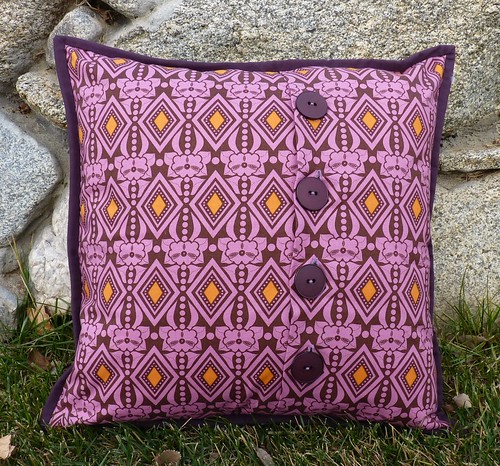
The back has an envelope closure with four large buttons. The fabric I used is Buttoned Up in plum from Anna Maria Horner's Good Folks line (one of my favorites). It might be hard to tell, but the outer border and binding is Kona raisin, a deep purple that I have enjoyed sewing with in a couple of projects this past year.
The front is quilted in a diagonal through the blocks with a grey Gutterman thread, and in matching thread colors for each of the borders. I'm so pleased with how it turned out, and even more pleased that it is now crossed off the list!

I hope your week is off to a great start as well!
So, Jennifer over at Ellison Lane Quilts has been hosting a Mini Quilt Challenge Contest this month. I only learned about it this week (I am often not up on everything in blogland--there is so much inspiration out there!), and knew it was the perfect nudge I needed to finish something up that I started too long ago. Last fall I was inspired by this post over at Stitched in Color. I grabbed my solids, picked up a few more at my LQS, and got to work. I didn't have time to make any of the deadlines, so I let my project become a neglected WIP. Fast forward to this week, and I am happy to say I finished and LOVE it! Ironically, even though I took photos earlier today, I didn't have a chance to sit down to write my post until four minutes after the deadline. Definitely a bummer, definitely typical of me (I am not an on-time person...at all), but I really am still happy to have finished. So, without further ado, here is what I have dubbed, Solids Squared.
Though this is actually a pillow cover, I have learned recently that a mini can be made into anything. Mini quilts have no place in my house for now, though I do want them in my future sewing room (too bad, right? It actually looks wonderful on my kitchen wall, don't you think?), but pillows are easier to work in. This particular one doesn't actually work in my house, but the point is I was inspired, I tried something out, had fun, and it will be finding a new home with a friend very soon.
It measures about 17" square and includes 16 different Kona cotton solids and one Moda Bella solid (a dark brown that I bought a few years ago). The Konas are ash, stone, curry, raisin, petal, plum, slate, papaya, mango, yarrow, corn yellow, sage, olive, caribbean, teal blue, and snow (border). I think those are all correct, at least as well as I can tell from my Kona color card. ;)
The back has an envelope closure with four large buttons. The fabric I used is Buttoned Up in plum from Anna Maria Horner's Good Folks line (one of my favorites). It might be hard to tell, but the outer border and binding is Kona raisin, a deep purple that I have enjoyed sewing with in a couple of projects this past year.
The front is quilted in a diagonal through the blocks with a grey Gutterman thread, and in matching thread colors for each of the borders. I'm so pleased with how it turned out, and even more pleased that it is now crossed off the list!
I hope your week is off to a great start as well!
Saturday, March 3, 2012
Just a Little Bit of Everything
Welcome [back] to my new blog, with a new and wonderful look!! The beautiful design was made by the ever talented Holly of Bijoux Lovely. Don't you love it? I know I do!! We worked out a swap for all of this loveliness, so be on the lookout for my end of the deal. ;)
Lately I have not really been finishing anything, but have rather hand my hand in a bit of everything. I feel a bit ADD, which is nice for the creative process when you want to switch it up, but sometimes it just overwhelms me more to have so many WIPs. Not to mention the looooong list of additional projects I want to make!
Last Sunday I had the pleasure of trying out the Go! Baby cutter that belongs to the BMQG. I have been collecting fabric for a year and a half to make a drunkard's path quilt for my son, so the drunkard's path die has been a big 'yes, please!' for me.

While I love how the cutter works and greatly appreciate not having to hand-cut all of those curves (boy is it nice!), I think the finished 3.5" blocks are a bit too small for some of the fabrics I have chosen that have a larger scale (such as the giant octopi from Heather Ross's Mendocino line). I did, however, find a great tutorial for making your own template in whatever size you want, so as soon as I find my compass I will get to work.
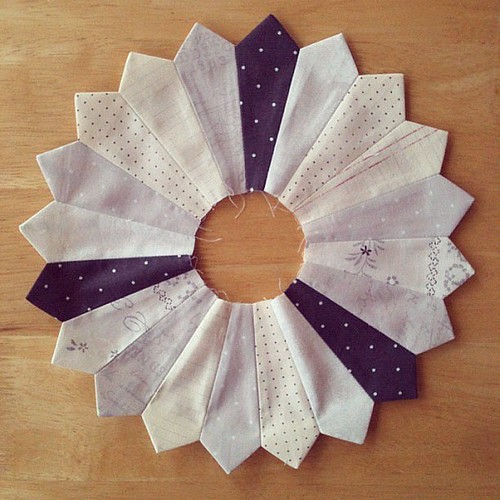
I also got a new dresden ruler recently, the EZ Dresden by Darlene Zimmerman. I wanted to try it out with some fabric that I bought last fall, all of the above at my favorite LQS Strawberry Patches. I don't even know what the line is called, though I do know the notebook paper print is by Basic Grey. Anyhow, it was super easy and came together rather quickly. It still needs a center and I'm pretty sure I'm going to turn it into a pillow, but who knows when that finish will come because, as I said, it was something fun that satisfied my crafty appetite that day. ;)
Last, but not least, my family room has been in complete disarray for over a week while I've pulled, paired, and chopped fabric to make a Granny Square Quilt.

If you are not familiar with the crazy phenomenon that has swept Flickr and the online quilting community, short and sweet it was inspired by this beauty by Jolene of Blue Elephant Stitches. Old Red Barn Co. is even having a quilt along (though I had made my mind up to make one even before this...as if that matters, lol!). Check out the Flickr group.for more info if you're interested. Last night I finally was satisfied with the amount of squares cut (though I still need to cut about 20 more prints) and made my first block. I.am.in.love! Let's hope the rest of them look this good. ;)

Okay, so I know I can't be the only one who dabbles with dozens of projects at a time. How many do you have going right now? And for those of you who do not have crafty ADD, how in the world do you stay focused??
Lately I have not really been finishing anything, but have rather hand my hand in a bit of everything. I feel a bit ADD, which is nice for the creative process when you want to switch it up, but sometimes it just overwhelms me more to have so many WIPs. Not to mention the looooong list of additional projects I want to make!
Last Sunday I had the pleasure of trying out the Go! Baby cutter that belongs to the BMQG. I have been collecting fabric for a year and a half to make a drunkard's path quilt for my son, so the drunkard's path die has been a big 'yes, please!' for me.
While I love how the cutter works and greatly appreciate not having to hand-cut all of those curves (boy is it nice!), I think the finished 3.5" blocks are a bit too small for some of the fabrics I have chosen that have a larger scale (such as the giant octopi from Heather Ross's Mendocino line). I did, however, find a great tutorial for making your own template in whatever size you want, so as soon as I find my compass I will get to work.
I also got a new dresden ruler recently, the EZ Dresden by Darlene Zimmerman. I wanted to try it out with some fabric that I bought last fall, all of the above at my favorite LQS Strawberry Patches. I don't even know what the line is called, though I do know the notebook paper print is by Basic Grey. Anyhow, it was super easy and came together rather quickly. It still needs a center and I'm pretty sure I'm going to turn it into a pillow, but who knows when that finish will come because, as I said, it was something fun that satisfied my crafty appetite that day. ;)
Last, but not least, my family room has been in complete disarray for over a week while I've pulled, paired, and chopped fabric to make a Granny Square Quilt.
If you are not familiar with the crazy phenomenon that has swept Flickr and the online quilting community, short and sweet it was inspired by this beauty by Jolene of Blue Elephant Stitches. Old Red Barn Co. is even having a quilt along (though I had made my mind up to make one even before this...as if that matters, lol!). Check out the Flickr group.for more info if you're interested. Last night I finally was satisfied with the amount of squares cut (though I still need to cut about 20 more prints) and made my first block. I.am.in.love! Let's hope the rest of them look this good. ;)
Okay, so I know I can't be the only one who dabbles with dozens of projects at a time. How many do you have going right now? And for those of you who do not have crafty ADD, how in the world do you stay focused??
Wednesday, February 22, 2012
Testing
For awhile now I have considered starting a blog about all of my sewing and quilting projects. I admit that I have attempted blogging before (a family one) and failed miserably, posting as little as once per year and, well, it's been almost two years since I last posted. Sheesh! In all honesty I am a wordy writer when it comes to...hmmm, pretty much anything. I also am not a fan of editing photos and blogger has just not been entirely cooperative with me. But, I am going to try posting my photos from Flickr to see if it makes this process less painful. If it works (and if I can find a prettier design for this page!), then I just might make an appearance more often than once a year. ;) In any case, you can always find me on Flickr (now how do I link to that?) under the username mjandco. Go ahead, check me out!
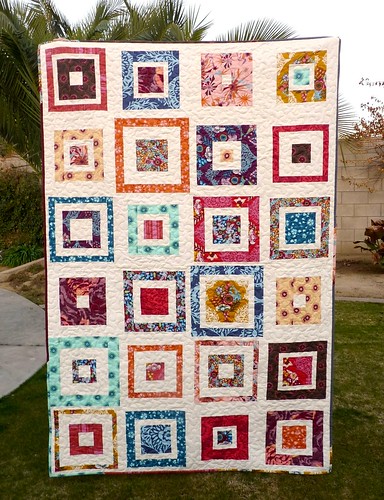
This is the quilt I made for my sister for Christmas. A little late, but she loves it and uses it often. Mission accomplished! It is made out of gorgeous Innocent Crush fabric by Anna Maria Horner (who just so happens to be my favorite quilting cotton fabric designer) in a square in square pattern I drafted myself.

It is the largest quilt I have made thus far (about 47" x 71") and I also quilted it myself in a free-motion stippled pattern on my Bernina 220. Not bad for my third FMQ quilt, eh?
And since this is going so easily, here is one more quilt I also finished last month.

This one is made in Joel Dewberry's Aviary line. It was a WIP (work in progress) for too long. I had the top done two weeks before my daughter was born (and she came nearly a month early...almost 3 years ago), but I was so intimidated to free motion quilt it like I wanted that it just sat and sat.

Thankfully it is now finished and on her bed and will be a great quilt to grow with her for awhile, since now she is ready for a big girl twin bed and I have a new quilt on the brain to make her for it. ;)
Phew, wasn't all of that a mouthful! Don't say I didn't warn you that I am a wordy writer, haha!
This is the quilt I made for my sister for Christmas. A little late, but she loves it and uses it often. Mission accomplished! It is made out of gorgeous Innocent Crush fabric by Anna Maria Horner (who just so happens to be my favorite quilting cotton fabric designer) in a square in square pattern I drafted myself.
It is the largest quilt I have made thus far (about 47" x 71") and I also quilted it myself in a free-motion stippled pattern on my Bernina 220. Not bad for my third FMQ quilt, eh?
And since this is going so easily, here is one more quilt I also finished last month.
This one is made in Joel Dewberry's Aviary line. It was a WIP (work in progress) for too long. I had the top done two weeks before my daughter was born (and she came nearly a month early...almost 3 years ago), but I was so intimidated to free motion quilt it like I wanted that it just sat and sat.
Thankfully it is now finished and on her bed and will be a great quilt to grow with her for awhile, since now she is ready for a big girl twin bed and I have a new quilt on the brain to make her for it. ;)
Phew, wasn't all of that a mouthful! Don't say I didn't warn you that I am a wordy writer, haha!
Subscribe to:
Posts (Atom)